Step 6: Set Up Device Families
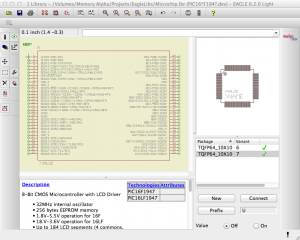
My test case was a PIC16F1947. This chip is actually part of a family of two devices, the other being the PIC16F1946. The ’46 is identical to the ’47, with the exception that it has half the amount the flash and data RAM. The chips are also both available in a low-power variant, designed as 16LF instead of 16F.
How do I make EAGLE recognize that?
The procedure is actually fairly simple. EAGLE uses a simple wildcard system in the part name that substitutes available technologies (F or LF in this case) and variants (where the part number might be slightly different). An asterisk in the device name will be replaced with the selected technology, and a question mark with the variant name.
So the first step is to rename the part. To do this, you first open it, and then select Rename from the Library menu. In my example, I changed it to “PIC16*F194?”. EAGLE by default has an empty technology (shown as ” in the Technologies dialog), and the part is imported with a single, un-named variant.
To name the initial variant, select it in the list on the right-hand pane, right-click, and select Rename. I entered 6 for the initial variant name. Looking in the description pane, I now had a single part listed in the table (PIC16F1946).
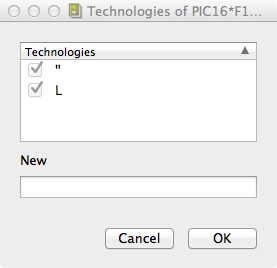
I also want an LF version of this part, so I next clicked on the Technologies link in the description pane. This produces the dialog shown at right; enter L in to the “New” text box, and click OK. Now I’ll see two entries in the table: PIC16F1946, and PIC16LF1946.
And that’s it for the ’46; everything is there, right? Now all I have to do is add a variant for the ’47.
To accomplish this, click the New button at the bottom of the right-hand pane. You’ll then need to select the package for your new variant, ensuring it’s the same as for the existing one. Enter the new variant name (7 for my new variant), and click OK.
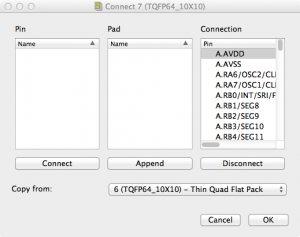
The only catch is that you’ll see a warning icon in the variants list because none of the pins are mapped between the symbol and the package. Fortunately, this is easy to fix.
To correct it, double-click the variant. Rather than manually assigning the pins, you can copy them from the existing variant by selecting it in the Copy From: dropdown (which is less than obvious because it’s poorly labeled). Select the variant to copy from, and click OK.
With these steps completed, and your new variant selected in the list on the right, you’ll see a single part listed in the table in the description pane: PIC16F1947. EAGLE assigns technologies on a per-variant basis, so you’ll need to click the Technologies link again, and check the box next to L. When you click OK, both the F and LF variants will appear in the list.
Step 7: Finishing The Job
Actually, you’re mostly done at this point. The only other tweak I had to make on my sample part was to move the symbol in the device editor. By default, the editor centers the part on the symbol’s mark, which will be at the location of pin 1.
Fixing this is simple: click the move tool, click pin 1, drag the symbol where you want it, and click again.
Now save your library, and your part is ready to use.
While Ultra Librarian doesn’t do a very good job with labeling and whatnot, the important parts (pad layouts and the like) seem to be pretty solid. It’s also a lot easier than it looks; once you know what needs to be done, it only takes a few minutes. Much easier than generating everything by hand!
The tool does the hard work for you, and you can use that as a starting point for your own library components. Even if you want to, say, group the pins by function in the symbol, having them already defines makes this much easier to do.
And the best part?
You can get .blx files for just about every chip Microchip makes.
Sweet!
S.


Thanks Steve, this is very helpful. I’m having a problem, though with part names not showing up on the schematic. They import nicely into Eagle, but I am not able to change REFDES or TYPE. After clicking the info button, and the + on the component, a properties box pops up titled GATE. I am not able to select REFDES or TYPE. Any idea how I can change the REFDES to show the component in the schematic? I am using the free version of Eagle 6.2.
It sounds like you’re editing the wrong item; you’re in the device editor, which only allows you to edit the relationships between symbols and packages, not the symbols and packages themselves.
If you want to edit what appears in the schematic, look at the top tool bar; if you’re using the defaults, the fifth button from the left will select a package to edit, and the one to the right of it will select the symbol.
Hope this helps!
I got bit in the same way — I couldn’t edit or group as the earlier poster indicated.. After following your suggestion that fixed it for me! Thanks for the great help!
Pingback: Generate Any Microchip PIC Footprint For EAGLE | Macdweller | The Frogs blog
How do you enter Pin 1 Designator? I need the dot with dash for pin 1?