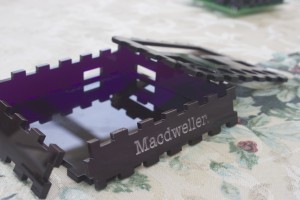
 I submitted the enclosure for TuneConsole to Ponoko on March 13, and that only proves that their service is distressingly slow. The acrylic panels arrived here on March 27, exactly two weeks later. I was out of town for an interview that day as luck would have it, so the box sat around for a while before I finally got around to breaking it open and finishing the hardware portion of the project.
Read on to see how it turned out…
The General Idea
I was way too lazy to design a T-slot setup to hold the thing together, so instead I used a simpler press-fit design. The basic box was generated using BoxMaker, which eliminated the majority of the hardest work. I drew up the final design with Adobe Illustrator since I had it laying around (and I can’t stand InkScape – or any other X11 app on the Mac, for that matter!).
Ponoko publishes templates for use with Illustrator, which made the process fairly painless. I simply copied each individual piece out of the BoxMaker-generated PDF, rotated as necessary, and arranged them to fit inside a P1 template. Once arranged, it was a simple matter to add the cutouts and the text.
Word to the wise: paper test your design before sending it off! No matter how accurate you think your design is, you’re liable to find a problem in one place or another, even if only aesthetically. In my case, it took six or seven revisions before I decided to be happy with it.
Those hours were well spent, though: it was a much better plan than ordering a box that the board wouldn’t fit in!


Pingback: An iTunes rating box for everyone - Hack a Day
Pingback: An iTunes rating box for everyone » Geko Geek
Pingback: An iTunes rating box for everyone « vis a vis | visual mind
Pingback: An iTunes rating box for everyone « Hackaday « Cool Internet Projects
Please, please release this as open source! I have been looking for a project like this!
I really like what you did here – are you thinking about producing a kit, opening it up or something?
My current thought is to design a second, lower-cost version (this one is quite expensive to build) and offer it either as a kit or a finished product (or both). Haven’t made any decisions though, so I’m open to suggestions.
I’d prefer a kit (or even a PCB and links to the parts on digi-key or something) to a finished product. Lower cost sounds good to me!
I’ll certainly keep that in mind. As an aside, I just posted the Eagle design files over on DP (we’ll see if they decide to use them for the video); feel free to take a peek.
The firmware source is still a problem; I don’t think the MAL license allows redistribution. I’ll probably switch it out with the DP stack at some point.
How much would you be willing to spend on parts to build something like this as a kit? My biggest concern is the expense involved in the buttons; those are $30+ on their own. I’m looking for lower-cost solutions, but the one I’ll likely end up with will be a while in coming.
Nice execution!
This is a really awesome project! I am a site manager on Instructables.com. You should consider submitting this as an entry to our Make It Real Challenge. We’re giving away over $100k in 3D printers.
link -> instructables.com/contest/maketireal
I would be happy to feature it on our site if you decide to post the instructions there and help get it noticed among our 13.8 million viewers. Let me know if you have any questions!
Cheers!
Audrey
audrey@instructables.com
I’ll keep it in mind, thanks! There’s a license issue with the firmware at the moment, however, so I unfortunately probably won’t make the deadline for the contest.
Very rapidly this site will be famous amid all blogging and site-building viewers, due to
it’s fastidious posts